返回目录
题目描述
黑白图像常采用灰度图的方式存储,即图像的每个像素填充一个灰色阶段值,256节阶灰图是一个灰阶值取值范围为0-255的灰阶矩阵,0表示全黑,255表示全白,范围内的其他值表示不同的灰度。
但在计算机中实际存储时,会使用压缩算法,其中一个种压缩格式描述如如下:
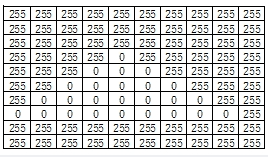
10 10 255 34 0 1 255 8 0 3 255 6 0 5 255 4 0 7 255 2 0 9 255 21
- 所有的数值以空格分隔;
- 前两个数分别表示矩阵的行数和列数;
- 从第三个数开始,每两个数一组,每组第一个数是灰阶值,第二个数表示该灰阶值从左到右,从上到下(可理解为二维数组按行存储在一维矩阵中)的连续像素个数。比如题目所述的例子, “255 34” 表示有连续 34 个像素的灰阶值是 255。
如下图所:连续34个255,1个0 再来连续8个255。

如此,图像软件在打开此格式灰度图的时候,就可以根据此算法从压缩数据恢复出原始灰度图矩阵。
请从输入的压缩数恢复灰度图原始矩阵,并返回指定像素的灰阶值。
输入描述
输入包行两行,第一行是灰度图压缩数据,第二行表示一个像素位置的行号和列号,如 0 0 表示左上角像素。
备注:
1、系保证输入的压缩数据是合法有效的,不会出现数据起界、数值不合法等无法恢复的场景;
2、系统保证输入的像素坐标是合法的,不会出现不在矩阵中的像素;
3、矩阵的行和列数范图为:(0,100];
4、灰阶值取值范图:[0,255];
10 10 255 34 0 1 255 8 0 3 255 6 0 5 255 4 0 7 255 2 0 9 255 21
3 4
输出描述
输出数据表示的灰阶矩阵的指定像素的灰阶值。
0 // 结合上面的图,第三行4列的值为0| 输入 | 10 10 56 34 99 1 87 8 99 3 255 6 99 3 255 6 99 5 255 4 99 7 255 21 3 4 |
|---|---|
| 输出 | 99 |
| 说明 | 将压缩数据恢复后的灰阶矩阵第3行第4列的像素灰阶值是99。 |
Python算法源码
# 读取第一行数据,包含压缩后的图像数据
compressed_line = input().strip()
compressed_stream = compressed_line.split()

# 读取第二行数据,包含要查询的像素位置
position_line = input().strip()
position_stream = position_line.split()

# 解析图像矩阵的行数和列数
rows, cols = map(int, compressed_stream[:2])

# 解析目标像素的行号和列号
target_row, target_col = map(int, position_stream)

# 初始化图像矩阵
image_matrix = [[0] * cols for _ in range(rows)]
index = 2  # 设置索引从压缩数据的第三个元素开始
current_row, current_col = 0, 0

# 循环直到处理完所有压缩数据
while index < len(compressed_stream):
    value, count = map(int, (compressed_stream[index], compressed_stream[index + 1]))
    index += 2
    # 根据连续像素个数填充图像矩阵
    for _ in range(count):
        image_matrix[current_row][current_col] = value
        current_col += 1
        # 如果当前列达到列数上限,移动到下一行并重置列号
        if current_col == cols:
            current_row += 1
            current_col = 0

# 获取目标像素的灰阶值并输出
print(image_matrix[target_row][target_col])
C语言算法源码
#include <stdio.h>

// 定义图像最大尺寸的常量
#define MAX_GRAPH_SIZE 1000

// 定义存储像素数据的结构体
typedef struct {
    int gray; // 灰度值
    int length; // 段长度
} PixelSegment;

// 函数:用像素值填充图像
void fillGraph(int graph[], int rows, int cols, PixelSegment segments[], int segmentCount) {
    int start = 0;

    // 遍历像素段
    for (int i = 0; i < segmentCount; i++) {
        int gray = segments[i].gray;
        int length = segments[i].length;

        // 将当前像素段填充到图像矩阵中
        for (int j = start; j < start + length; j++) {
            graph[j] = gray;
        }

        start += length;
    }
}

// 函数:获取像素的灰度值
int getPixelValue(int graph[], int cols, int x, int y) {
    return graph[x * cols + y];
}

int main() {
    // 声明变量:行数、列数、x、y
    int rows, cols, x, y;
    // 读取行数和列数
    scanf("%d %d", &rows, &cols);

    // 声明数组以存储像素段
    PixelSegment segments[MAX_GRAPH_SIZE];

    // 读取像素段,直到遇到非整数字符为止
    int segmentCount = 0;
    while (scanf("%d %d", &segments[segmentCount].gray, &segments[segmentCount].length)) {
        segmentCount++;

        // 如果遇到非整数字符,则跳出循环
        if (getchar() != ' ') break;
    }

    // 读取目标像素的坐标
    scanf("%d %d", &x, &y);

    // 声明数组以存储像素值
    int graph[rows * cols];

    // 用像素值填充图像
    fillGraph(graph, rows, cols, segments, segmentCount);

    // 获取并打印目标像素的灰度值
    printf("%d\n", getPixelValue(graph, cols, x, y));

    return 0;
}
Java算法源码
import java.util.Scanner;

public class Main {
    public static void main(String[] args) {
        Scanner scanner = new Scanner(System.in);

        // 读取压缩数据
        String[] compressedLine = scanner.nextLine().split(" ");
        int[] compressedData = new int[compressedLine.length];
        for (int i = 0; i < compressedLine.length; i++) {
            compressedData[i] = Integer.parseInt(compressedLine[i]);
        }

        // 读取要查询的像素位置
        String[] positionLine = scanner.nextLine().split(" ");
        int[] pixelPosition = new int[positionLine.length];
        for (int i = 0; i < positionLine.length; i++) {
            pixelPosition[i] = Integer.parseInt(positionLine[i]);
        }

        // 解析图像矩阵的行数和列数
        int rows = compressedData[0];
        int cols = compressedData[1];

        // 解析目标像素的行号和列号
        int targetRow = pixelPosition[0];
        int targetCol = pixelPosition[1];

        // 初始化图像矩阵
        int[][] imageMatrix = new int[rows][cols];

        // 设置索引从压缩数据的第三个元素开始
        int index = 2;
        int currentRow = 0, currentCol = 0;

        // 循环直到处理完所有压缩数据
        while (index < compressedData.length) {
            int value = compressedData[index];
            int count = compressedData[index + 1];
            index += 2;

            // 根据连续像素个数填充图像矩阵
            for (int i = 0; i < count; i++) {
                imageMatrix[currentRow][currentCol] = value;
                currentCol++;
                // 如果当前列达到列数上限,移动到下一行并重置列号
                if (currentCol == cols) {
                    currentRow++;
                    currentCol = 0;
                }
            }
        }

        // 获取目标像素的灰阶值并输出
        System.out.println(imageMatrix[targetRow][targetCol]);
    }
}
3 条评论
[...]2024 C卷 100分序号题目知 识 点难易程度1密码输入检测数据结构/栈☆☆☆2分配土地几何问题☆☆☆3找座位逻辑分析☆☆☆4智能成绩表动态条件分析☆☆☆5内存冷热标记多条件排序☆☆☆6螺旋数字矩阵逻辑分析☆☆☆7围棋的气逻辑分析☆☆☆8分割平衡字符串逻辑分析☆☆☆9机器人搬砖二分法☆☆☆10转盘寿司数据结构/栈/单调栈☆☆☆11小明找位置二分法☆☆☆12提取字符串的最长合法简单数学表达式双指[...]
[...]2024 C卷 100分序号题目知 识 点难易程度1密码输入检测数据结构/栈☆☆☆2分配土地几何问题☆☆☆3找座位逻辑分析☆☆☆4智能成绩表动态条件分析☆☆☆5内存冷热标记多条件排序☆☆☆6螺旋数字矩阵逻辑分析☆☆☆7围棋的气逻辑分析☆☆☆8分割平衡字符串逻辑分析☆☆☆9机器人搬砖二分法☆☆☆10转盘寿司数据结构/栈/单调栈☆☆☆11小明找位置二分法☆☆☆12提取字符串的最长合法简单数学表达式双指[...]
[...]2024 C卷 100分序号题目知 识 点难易程度1密码输入检测数据结构/栈☆☆☆2分配土地几何问题☆☆☆3找座位逻辑分析☆☆☆4智能成绩表动态条件分析☆☆☆5内存冷热标记多条件排序☆☆☆6螺旋数字矩阵逻辑分析☆☆☆7围棋的气逻辑分析☆☆☆8分割平衡字符串逻辑分析☆☆☆9机器人搬砖二分法☆☆☆10转盘寿司数据结构/栈/单调栈☆☆☆11小明找位置二分法☆☆☆12提取字符串的最长合法简单数学表达式双指[...]